Getting Started
After activating your theme, visit the Customizer to set up the basic theme settings, such as background color, custom header, site logo, or custom menu.
Index
Required Plugin
Jetpack is required plugin for Bandana WordPress theme. Jetpack is comprehensive and free plugin by WordPress.com which provides several features under one roof. You need to install and activate the Jetpack plugin in order to use the supported modules.
For Example:
- Featured Content
- Portfolios
- Testimonials
- Infinite Scroll
- Custom CSS
- Many More…
Site Logo
Go to Customizer → Site Identity to add your site logo.
Check out this guide for full details on how to set up a site logo.
Featured Content
Bandana includes an eye-catching featured content area on the home page. Capture your visitors’ attention and lead them to specific posts or pages.
Here are some tips to help you get the featured content set up.
- Go to Customizer → Featured Content and add the featured tag, or a tag of your choice. Bandana supports five posts or pages in its featured content area.
- Create or edit a post or page you wish to feature. Assign the special tag from step one to this post or page.
- Set a Featured Image for your post or page. Use big and beautiful featured images for the featured content area.
- Publish or Update the post or page.
By default, the Featured Content posts will not appear with your regular posts. This is to avoid displaying the posts twice.
You can change this by going to Customizer → Featured Content, and checking the box labeled “Display tag content in all listings.”
Setting Up the Front Page with Front Page Template
Front Page template will display different sections e.g. Featured Pages, Portfolios, Testimonials on your site’s home page.
When you first activate Bandana, your posts will display in a traditional blog format. If you would like to set front page of your site (like Bandana’s demo site), just follow these instructions:
- Create or Edit a page, and assign it to the Front Page Template from the Page Attributes module.
- Go to Settings → Reading and set “Front page displays” to “A static page”.
- Select your front page as the “Front page,” and then choose another page as the “Posts page,” (to display your blog posts).
You can customize the Front Page Sections by going to Customizer → Theme Options → Front Page: Options.
Theme Options
You’ll find Bandana’s theme options in the Customizer, under Customizer → Theme Options.
General Options
You’ll find Bandana’s general options in the Customizer, under Customizer → Theme Options → General Options.
Site Hero Options
You’ll find Bandana’s site hero options in the Customizer, under Customizer → Theme Options → Site Hero Options.
Content Options
You’ll find Bandana’s content options in the Customizer, under Customizer → Theme Options → Content Options.
Skin Options
You’ll find Bandana’s skin options in the Customizer, under Customizer → Theme Options → Skin Options.
Headings Fonts Options
You’ll find Bandana’s headings fonts options in the Customizer, under Customizer → Theme Options → Headings Fonts Options.
Body Fonts Options
You’ll find Bandana’s body fonts options in the Customizer, under Customizer → Theme Options → Body Fonts Options.
Menu Fonts Options
You’ll find Bandana’s menu fonts options in the Customizer, under Customizer → Theme Options → Menu Fonts Options.
Ad Options
You’ll find Bandana’s ads options in the Customizer, under Customizer → Theme Options → Ads Options.
You can display Google AdSense ads or ads of other networks by using ad code in the given fields. You can also control the display of ads on single regular blog post, single regular blog page or single post of any post type by the given options.
WooCommerce Options
You’ll find Bandana’s WooCommerce options in the Customizer, under Customizer → Theme Options → WooCommerce Options.
Footer Options
You’ll find Bandana’s Footer options in the Customizer, under Customizer → Theme Options → Footer Options.
Utility Options
You’ll find Bandana’s Utility options in the Customizer, under Customizer → Theme Options → Utility Options.
Front Page Sections
You’ll find Bandana’s Front Page sections in the Customizer, under Customizer → Theme Options → Front Page: Options.
Front Page sections will only be visible when the Front Page will be active in the Customizer. If you have not setup front page, please follow the Front Page Setup section of documentation.
You will find the following Front Page sections to control their respective settings.
- Front Page: General Options
- Front Page: Featured Page Options
- Front Page: Portfolio Options
- Front Page: Testimonial Options
Featured Images
Bandana supports Featured Images on blog posts and pages. They appear near the title on the blog index and archive pages. For best results, use an image at least 1920px wide and 600px high.
If you upload larger Featured Images or images with different proportions, they will be automatically resized to match the required dimensions.
Typography
Bandana has several built-in typography features to enhance your blogging experience. Please visit the links in order to know how to use them.
Blockquotes
Bandana has given special attention on blockquotes to enhance your blogging experience. Please visit the links in order to know how to use them.
Lists and Code
Bandana supports lists and code professionally to enhance your blogging experience. Please visit the links in order to know how to use them.
Tables
Bandana has different style of tables in order to enhance your blogging experience. Please visit the links in order to know how to use them.
Buttons
Bandana has different style of buttons in order to enhance your blogging experience. Please visit the links in order to know how to use them.
CSS3 Multiple Columns
Bandana supports modern feature of CSS3 Multiple Columns in order to enhance your blogging experience. Please visit the links in order to know how to use them.
Add a Custom Header Image
Add a Custom Header image by going to Customizer → Header. Your uploaded image should be at least 150px tall. The width should be at least 1920px to provide a visually crisp background.
Add a Custom Background Image or Color
Add a Custom Background via Customizer → Background. You must choose the Box Layout in the Customizer’s Theme Options area to see background colors or images.
Custom Menus
Bandana allows you to have four Custom Menus, which can be set under Customizer → Menus.
Select the Header Menu location in the Menu Settings to display your Custom Menu in the header.
Select the Footer Menu location in the Menu Settings to display your Custom Menu in the footer.
Select the Top Menu Header location in the Menu Settings to display your Custom Menu in the top bar of header.
Select the Info Menu Header location in the Menu Settings to display your Custom Menu in the top bar of header.
Custom Menus Icons
Bandana theme supports to add FontAwesome icons to the WordPress Custom Menus. Just follow the simple steps to add FontAwesome icons to the WordPress Custom Menus.
Step 1: Show CSS Classes Options on Menu Screen

- Go to Appearance → Menus.
- Open the advanced menu settings by toggling the Screen Options menu at the top of the page.
- Check the box for CSS Classes in the Show advanced menu properties.
Step 2: Enter the CSS Class for the Menu Icon
You need to add FontAwesome icon CSS Class in the CSS Classes text box for any menu item.
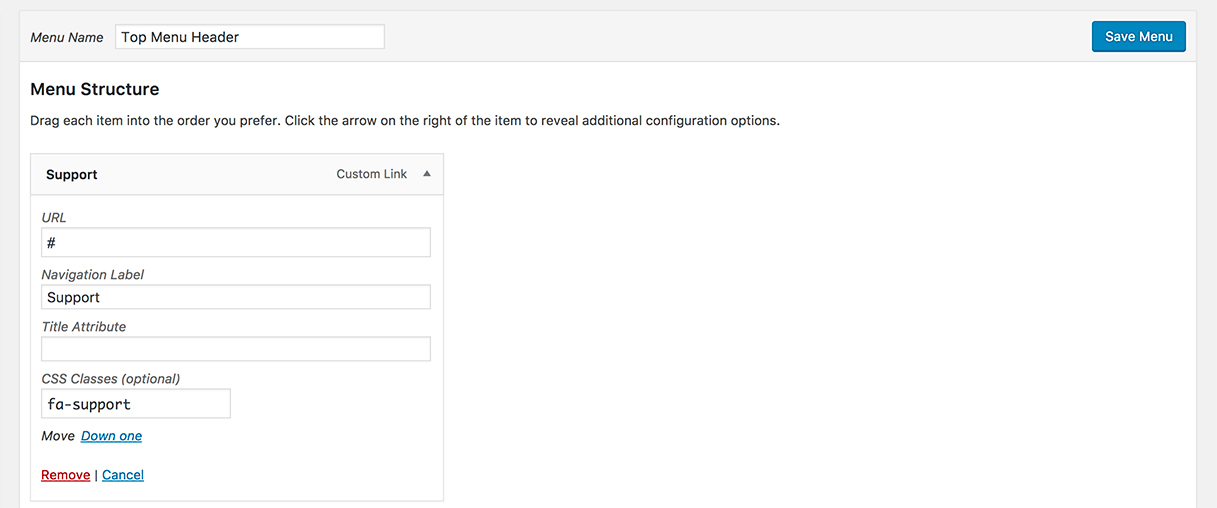
You can find the FontAwesome icons and their classes from the Font Awesome page or by using the the cheatsheet. You need to prefix each class with fa- keyword.
Social Links Menus
Bandana allows you to display links to your social media profiles — like Twitter and Facebook — as icons using a Social Links Menu in two locations.
Select Social Menu Header location in the Menu Settings to display Social Menu in the header.
Select Social Menu Footer Menu location in the Menu Settings to display Social Menu in the footer.
Read the full guide for setup instructions.
Available Icons
Linking to any of the following sites will automatically display its icon in your menu.
- CodePen
- Digg
- Dribbble
- Dropbox
- Flickr
- FourSquare
- GetPocket
- GitHub
- Google+
- Email (
mailto:links) - RSS Feed (urls with
/feed/) - Spotify
- StumbleUpon
- Tumblr
- Twitch
- Vimeo
- WordPress
- YouTube
Widget Areas
Bandana comes with five widget areas: one in the sidebar, one in the footer area full width for Instagram feed and up to three in the footer. The footer widget areas will activate once you add widgets to them in Customizer → Widgets.
Custom Widgets
Bandana features three custom widgets:
Bandana: Instagram
The Instagram widget displays Instagram images on the top of footer widgets. Go to Customizer → Widgets to use the Bandana: Instagram widget.
Bandana: Post Carousel
The Post Carousel widget displays the posts in a rotating slideshow with Featured Images. Go to Customizer → Widgets to use the Bandana: Post Carousel widget.
Bandana: Post List
The Post List widget displays posts alongside a small Featured Image. Go to Customizer → Widgets to use the Bandana: Post List widget.